
Setting up a TP-Link TL-WR841N for remote debugging I
Introduction
Hi there! In this short blog post I’ll describe the steps that I followed to be able to (remotely) debug a process running in a TP-Link TL-WR841N Router. This has been explained several times and I use this blog post more as a personal note than a post, but maybe it could be useful for someone else.
Setting up access to the Serial interface
I started opening the router and locating the Serial interface. I soldered some pins as shown in the image below to connect to it. This interface it’s using the UART protocol, I used a Bus Pirate as the interface between my PC and the device but any TTL-Serial to USB adapter will work.
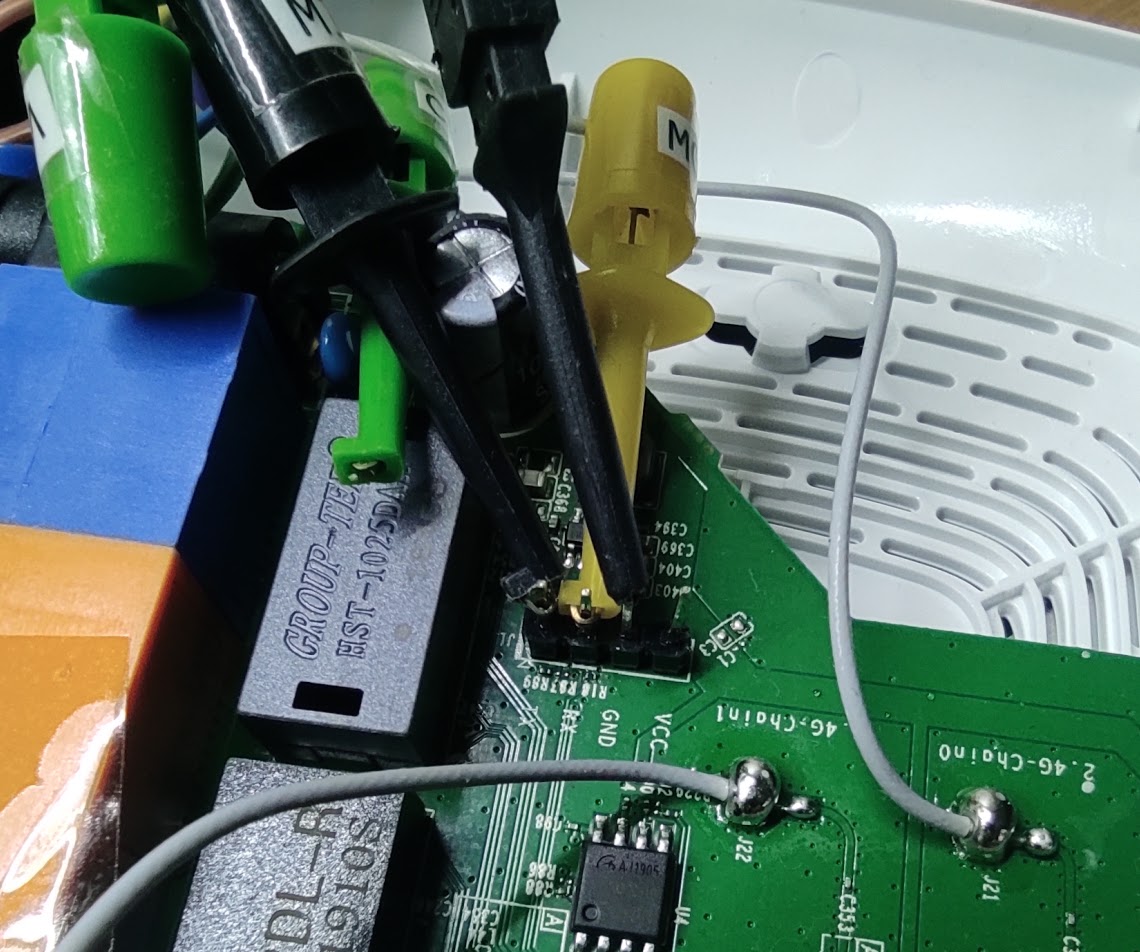
From left to right in the image we have TX (connect the MISO Pin from the BP), RX (connect the MOSI Pin from the BP), and GND.
Using minicom to connect to the Bus Pirate
Once I had everything connected I started Minicom to connect to the Bus Pirate using the following command line:
minicom -b 115200 -D /dev/ttyUSB0
Note: the virtual device /dev/ttyUSB0 can change, it is possible to add an udev rule to avoid this following these step. After these steps are done you’ll be able to connect to the Bus Pirate specifying something like /dev/buspirate.
Normally you will need root or have your user added to specific groups to access /dev/ttyUSBX devices, in my case using Ubuntu 20.04 I had to add my user to the following groups:
- dialout
- tty
you can add your user to these groups executing:
usermod -a -G <group> $USER
You’ll have to logout and login again for the changes to take effect.
Accessing the root shell over the UART interface
Once everything is set up and connected, we’ll need to configure the Bus Pirate as a transparent bridge, for that:
- Press
mand select3(UART). - Select
9(115200 bps). - Select
1(8 bits, Parity = None) - Select
1(Stop bits 1) - Select
1(Receive Polarity Idle 1) - Select
2(Output type Normal)
You should see how the prompt changed to UART>. Now we’ll select the transparent bridge Macro. For that write (1) and press Enter. You’ll receive a confirmation message, type y. Now the BP is in transparent bridge mode. You can power up your router and you’ll see the boot sequence displayed in the screen. To quit this mode you’ll have to reset your BP (disconnecting it from the USB port is enough).
Once the booting process is finished, you will land on somewhat limited root shell. In the next section we’ll discuss how to upload files to the device.
Transferring files to the router
After playing some time with the device I found that — at least by default — SSH access is restricted and only available to use by a proprietary TP-Link application. A quick way that I found to upload files is to use the TFTP client that the router has and set up a TFTP server on my machine to serve the files.
Setting up a TFTP Server
To set up the TFTP server I followed this guide. I’m copying the steps below:
- Install the package:
apt-get install tftpd-hpa - To set the default root directory to serve files edit the file
/etc/default/tftpd-hpaand add the following line:TFTP_DIRECTORY="<DIRECTORY>" - Restart the service:
sudo service tftpd-hpa restart
Note: Please bear in mind that you’ll have a TFTP server running in your machine, remember to stop/disable the service once you don’t need it anymore.
Using TFTP in the Router
Now that we have set up a TFTP server in our machine we can tell the router to connect to it (remember to connect the router to your machine either using Ethernet or WiFi) and retrieve files with the following command:
tftp -g -r <BINARY> <TFTP_SERVER>
Let’s see where we can store the file:
/var/tmp # mount
rootfs on / type rootfs (rw)
/dev/root on / type squashfs (ro,relatime)
proc on /proc type proc (rw,relatime)
ramfs on /var type ramfs (rw,relatime)
/sys on /sys type sysfs (rw,relatime)
Note that our only option to store files is in /var/, but bear in mind that files will be deleted upon the next reboot as it is a Ramfs filesystem. For more information about Ramfs you can check this link.
Compiling binaries for the Router using Buildroot
Now that we can upload files it would be great to have something to upload, for example a full version of Busybox or maybe GDB Server to debug programs running on the router. Normally the easiest way of obtaining these files is just Googling (and trusting the source about the file’s real purpose). This time I decided to try a new tool, Buildroot.
Buildroot its aimed at devices with embedded Linux, it allows you to cross-compile a variety of different tools and packages for different architectures in a smooth and easy way, without worrying about downloading toolchains or dependencies, It has support for MIPS so I decided to give it a try.
After downloading it from its website I decompressed it and run the command:
make menuconfig
Once it finishes it will show a large menu with different options that will tell Buildroot what to build and how. In this specific case that the Router is using a MIP32 Processor in Little Endian and the uClibc I chose the following options (I’m adding here those non-default):
Target Options
- Target Architecture:
MIPS (Little Endian) - Target Architecture Variant:
Generic MIPS32 - Use soft-float:
Yes(*)
Build Options
- Strip target binaries:
Yes
Toolchain
- C library:
uClibc-ng - Enable WCHAR Support:
Yes - Thread library debugging:
Yes - GCC Compiler version:
gcc 8.x - Enable C++ Support:
Yes
Target Packages
- Debugging, profiling and benchmark -> GDB:
Yes
Once everything is set, the last step is save the configuration and execute make while having some coffee until the process finishes. Once everything is done, you’ll find the files of interest in: <buildroot_root>/output/target/usr/bin/ and the busybox binary under: <buildroot_root>/output/target/bin/busybox
Now you can copy these files to your TFTP directory and have it in your router!
(*) I read this interesting blog post from Synacktiv about this specific flag needed for a similar device.
Conclusions
Now we have a way to compile files for our router and send them to it. I hope this small blog post/guide it’s useful for you amd saves you some time. Also now we will be able to remotely debug our Router to perform more interesting things in future blog posts, stay tuned!.
References/Links
- TFTP Server installation - http://chschneider.eu/linux/server/tftpd-hpa.shtml
- Ramfs and tmpfs - https://www.thegeekstuff.com/2008/11/overview-of-ramfs-and-tmpfs-on-linux
- Buildroot - https://buildroot.org/
- uClibc - https://www.uclibc.org/
- Synacktiv: PWN2OWN TOKYO 2020: DEFEATING THE TP-LINK AC1750 - https://www.synacktiv.com/en/publications/pwn2own-tokyo-2020-defeating-the-tp-link-ac1750.html